How to Replace Dual-Clutch in DSG-7 Transmission
After hitting the market in 2003, a DSG (direct-shift gearbox) transmission became a true innovative solution for the transmission industry. The DSG transmission combines in itself features of classic automatic (comfort of operation) and manual transmissions (fuel efficiency).
But, at the same time, the reliability of DSG transmissions turned out to be not as high as it was expected to be by the manufacturers. In practice, numerous actuators and electronic components of the DSG transmission, as well as its clutch, became a real headache for transmission repair specialists. In this article we will learn how to replace the clutch in the DSG transmission. Currently, there are several DSG transmission models available on the market, namely, DSG-6, DSG-7, and Audi S-tronic.
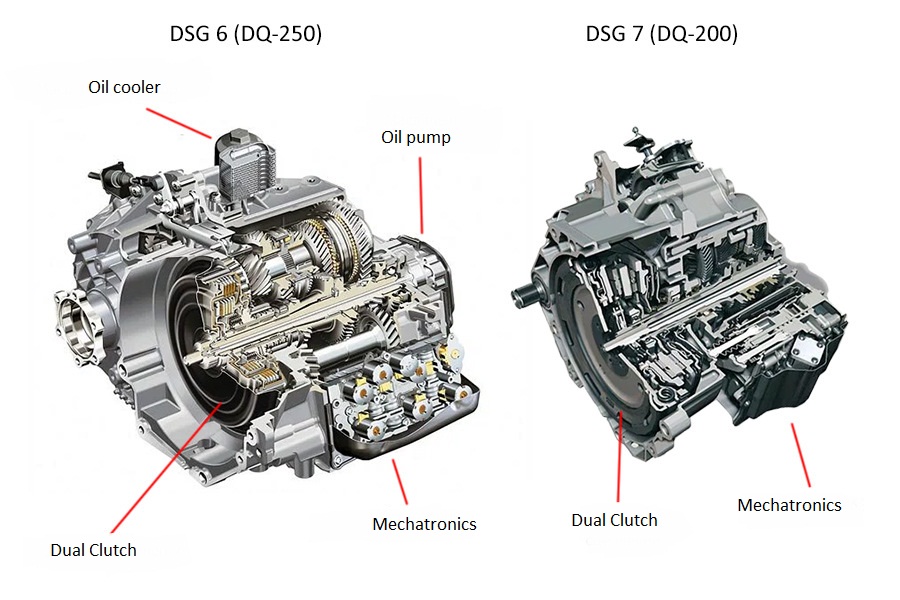
The clutch design in these gearboxes is similar
to the mechanism implemented in standard manual transmissions, but in case with
DSG transmissions there are 2 clutches at once (the clutch in a DSG can be
“wet” or “dry” depending on the gearbox type). The so-called “wet” clutch
operates in the oil bath.
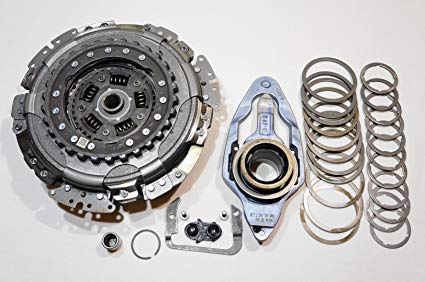
DSG-7 clutch package
In practice, the DSG-7 transmission equipped
with a “dry” clutch turned out to be the most problematic solution. After the
launch of this transmission model, the owners of cars equipped with this
gearbox frequently had to contact repair shops because of problems with the
DSG-7 and its clutch after running only 20-30 thousand kilometers. There are
many reasons for failure in the DSG-7 transmission – from lack of skill in
using the DSG transmission and non-compliance with certain rules of operation to
design flaws of the transmission itself.
Despite the fact that the manufacturer took
some measures on elimination of the most common issues, repair shops still have
many calls from owners of cars with the DSG-7 transmission with requests to
replace the clutch or to perform some other services. It should be taken into
account that repair services for this type of transmission are quite expensive.
Therefore, it is no wonder that many drivers
want to save money and try to fix the DSG-7 gearbox independently. It is
important to know that, in terms of design, this gearbox is quite sophisticated
(despite the fact that it is based on the manual gearbox) and to fix it
properly you require a certain level of experience and certain skills. However,
a number of repair services for the DSG transmission can be performed
independently (for example, transmission fluid change and clutch replacement).
Now let’s learn some peculiarities of the clutch replacement. First of all, you have to be certain that the problem is caused by the faulty clutch. Therefore, the 1-st step is to perform diagnostics. When you make sure that the issue is the clutch damage, then you will need to buy a new DSG-7 clutch (provided by LUK) or the DSG clutch repair kit.

Dual-clutch package for DSG-7 provided by LuK
The next step is to buy a toolkit to replace
the DSG clutch. It should be noted that this tool kit is quite expensive.
Therefore, it would be reasonable to find somebody who wants to perform the
same kind of repair and to share expenses. Today, it is quite common when car
owners share their experience on internet forums and help each other to solve
specific problems.
The availability of all necessary tools is an important condition, as it allows you to easily perform the entire range of required operations. Moreover, the LUK repair kit also includes some valuable information about the clutch change.
Old clutch removal
Firstly, you have to pull out the gearbox. It will be very useful to have a support to hold the gearbox fixed before unscrewing the fasteners. Before removing the clutch, check the transmission fluid. If the fluid level is low, it is contaminated, or you detect some leaks, then it is better to completely change the fluid. Now start the clutch removal.
- Lift out the circlip (snap ring).
- Pull out the clutch hub for K1.
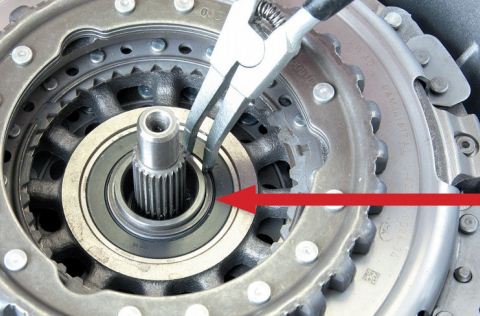
- Remove the circlip for the clutch package.
- Tear down the clutch packag.

- Dismantle the old forks, thrust bearing and the shim ring.
- The next step is to clean up the input shaft with the help of a mild chemical cleaning agent, which doesn’t contain aggressive solvents. Do not remove the lubricant on the shaft splines. At the same time, you should also check the shaft seal.
New clutch installation
- Now, we start the clutch installation.

- Install the new fork seat, the small fork (K2), and the K2 thrust bearing (without the shim).
- Install the tool on the shaft, and mount the circlip.

- Now your goal is to select an appropriate shim ring, which will fit the setting gauge.

- Correct installation will mean that the setting gauge will move no more than 0.1 mm or will not move at all. The shim ring must be selected according to individual tolerances.

- Such tolerances are indicated on the clutch (on the engine side). For instance, if the nominal thickness of the shim is 2.0 mm and the individual tolerance is +0.2 mm, then the thickness of the shim which should be installed in the clutch is 2.2 mm.
- The same procedure must be performed for the second clutch as well, since the DSG gearbox has 2 clutches (K1 and K2). After you select the necessary ring and hold the setting gauge fixed, the shim ring must correspond to the individual tolerance K2Clean the hollow shaft with a special lubricant; splines should also be lubricated. Prevent the lubricant from getting on clutch elements.
- Clean the hollow shaft with a special lubricant; splines should also be lubricated. Prevent the lubricant from getting on clutch elements.

- Install the new clutch on the hollow shaft.

- Measure the space between the upper edge of the bearing inner race and the surface of the hollow shaft. Normally, this parameter should not exceed eight millimeters.

- Install the support sleeve on the inner ring of the clutch bearing.

- Install 3 threaded bolts on the gearbox case using flange nuts. Note: depending on the available free space, use short or long bolts. Bolts should be located approximately 120° from each other.

- Use the knurled nut to install the cross-bar. The connection must be free of voltage and deformations. Note: Ensure that the shaft is installed exactly above the clutch and it bumps into the bearing sleeve. Check the ease of the shaft movement.

- When turning the shaft, press-fit the clutch on the hollow shaft by means of the bearing sleeve. Stop the process of press-fitting when the circlip is fully visible in the hole of the bearing sleeve. Warning! Further rotation of the shaft will damage the hollow shaft support and it will lead to the transmission failure. Note: Set the torque wrench to 16 Nm to rotate the shaft. If the torque is reached before the clutch is fully pressed, then the clutch is installed incorrectly.

- Install the circlip on the hollow shaft with the help of pliers. At the final stage of the DSG clutch installation, make sure that the circlip is pointed upwards.
- If you use the installation kit LUK, you have to check the end float (clearance). This operation is performed with the help of the dial indicator.

- Mount the dial indicator and the holder using a flange nut.

- Set the measuring anvil on the lower driven plate of the clutch, provide the preload and zero the indicator. Check the end float of the lower driven plate (K2). For this purpose, catch the driven disc with two special hooks, simultaneously pull up the hooks to the max and take readings of the indicator.Measurements should be made at 3 points, and the distance should be 120°. Allowed values range from 0.3 to 1 mm. If the end float is higher, then you’ve made a mistake. If that’s the case, the clutch must be reinstalled.
- After measuring, move the indicator aside, but do not remove it. You will need this tool when measuring the clearance of the upper driven disc of the clutch (K1).

- Install the clutch hub (K1). Note: The presence of only one large cog ensures that there is only one position for the hub installation.

- Install the circlip, the cog must be located in the middle of the circlip cut-out.
- Measure the end float for the driven disc of the clutch (K1).
- If the clutch is mounted correctly, you can prepare the transmission for installation.
- Install the gearbox in compliance with the requirements of the automaker
Warning! Connect the transmission to the engine manually until the engine flange and gearbox flange are in contact over the entire contact surface. Tighten the bolts. Failure to follow this sequence can damage the double clutch.

- After that, you have to adjust the clutch. For this purpose, use diagnostic cable VAG-Com.
- After connecting the cable, it is necessary to keep the temperature of transmission fluid at an average level (from 35 to degrees Celsius).
- The gear selector must be shifted to the “P” mode, then start the engine and allow it to operate at idle speed. During the process of adjustment press the brake pedal.
As can be seen, the process of the DSG clutch replacement is not very complicated, provided that you have some experience in performing required operations (gearbox removal, clutch installation, calibration, etc.) At the same time, the clutch replacement operation is time-consuming, and you need a special set of tools to maximally simplify the process, as well as the diagnostic cable for the clutch adjustment.
Useful tips on DSG
transmission
Despite all the difficulties, you can save much
money by performing the clutch replacement in the DSG transmission by yourself since
repair shops charge high for servicing this type of transmission. Problems with
the clutch in DSG transmissions are quite common, therefore in many cases the
independent repair of the car with the DSG transmission becomes the best
option.


